In my previous post, I discussed the basics of using a CustomAction to enhance the functionality of a content type. We used a CustomAction to redirect and pass some parameters to another page. This functionality is great, but what if you don’t want the user to go to another page for your custom logic to execute? To achieve this, we can build a custom control that will enable us to execute code located within a specific assembly. In this post, we’ll create a CustomAction that will mark a task as complete in one click.
To accomplish this, we will have to create a class which inherits from the SPLinkButton control. The reason we do this is so that we can override the OnClick event to perform our custom logic. Since the other buttons on the DisplayFormToolbar are also SPLinkButtons, our CustomAction will fit right in with some simple CSS styling.
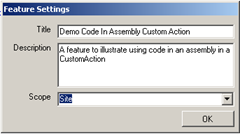
To start, go ahead and create a new WSPBuilder project called “CodeInAssemblyCustomActionsDemo” and add a Blank Feature to it named “DemoCodeInAssemblyCustomAction”. (If you have never used WSPBuilder before, feel free to look over my Intro to WSPBuilder post.) Use the following for feature settings:
Next, let’s add a new class to the project called CompleteTask. This class will inherit from the SPLinkButton class and we will provide custom code for it’s OnLoad and OnClick events. Add a reference to the Microsoft.SharePoint namespace and paste the following code into Visual Studio:
[code language=’c#’]
using System;
using System.Collections.Generic;
using System.Text;
using System.Web;
using Microsoft.SharePoint;
using Microsoft.SharePoint.WebControls;
using Microsoft.SharePoint.Utilities;
namespace CodeInAssemblyCustomActionsDemo
{
public class CompleteTask : SPLinkButton
{
protected override void OnLoad(EventArgs e)
{
// Set the default button text
this.Text = “Complete Task”;
// Style the button like the rest of the buttons on the toolbar
this.CssClass = “ms-toolbar”;
// Call the SPLinkButton.OnLoad event
base.OnLoad(e);
}
protected override void OnClick(EventArgs e)
{
// Get the current list item
SPListItem thisItem = SPContext.Current.ListItem;
// Set the status to Completed
thisItem[“Status”] = “Completed”;
// Update the ListItem
thisItem.Update();
// Redirect back to the list
SPUtility.Redirect(thisItem.ParentList.DefaultViewUrl, SPRedirectFlags.Default, HttpContext.Current);
// Call the SPLinkButton.OnClick event
base.OnClick(e);
}
}
}
[/code]
This class is rather simple. In the button’s OnLoad event, we simply set it’s Text and CssClass property and then call it’s base class’s OnLoad event. In the OnClick event, we get a reference to the current SPListItem, set it’s Status field to the value of Completed, and then call it’s Update method. Then we redirect back to the list itself.
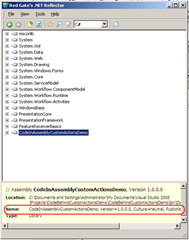
Next, we will need to create a CustomAction definition in the elements.xml file. To do this, we will first need to get the name of the assembly where our CompleteTask class is located. To do this, first build the project and then open up the assembly with Reflector and copy the name out of there:
Once we have the name of the assembly, we can construct the elements.xml file like so:
[code language=’xml’]
[/code]
The two differences from my previous CustomActions post that you will notice here are the existence of a ControlAssembly and ControlClass attribute. These notify SharePoint where it can find the code for your CustomAction. Note that your “ControlAssembly” attribute should have a different PublicKeyToken than what is shown above. We have also specified a RegistrationId of 0x0108 which is the Task content type.
Go ahead and build and deploy this WSP to your farm:
Activate the feature within “Site Collection Features”:
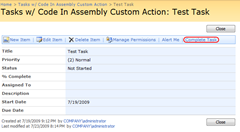
Finally, create a new task list and add an item to it. View the item, and you should see the new “Complete Task” button available:
Click the button and you should now see that your task has a Status of “Completed”:
Hopefully this has illustrated how simple it is to use code in an assembly for a CustomAction. We have just scratched the surface of CustomActions here and hopefully I will have more to post about them soon.


I tried to repeat this technique but did not succeed. My project, builds, deploys, and is available for activation. I activated it on a site then created a new list but the new control was not visible on the DispForm
Hey Terry,
Can you verify that your CompleteTask is a public class and that you have indeed used the correct assembly information in the elements.xml file? If the CompleteTask is not a public class, the SPLinkButton will not be visible on the DisplayForm. Are you using a task list? I ran through the tutorial just now and did not encounter any problems here.
Hi Michael,
I am following your code
Still i am unable to see the button in Sharepoint 2010 UI.
1.control added web.config.
2.class are Public
3.Assembly has correct name.
Please help me if any thing required to change.
Thanks in Advance
Hi Michael
I am unable o add the button dispalyToolbar
I can add the button to EditControlBlock.
Please help me why I am unable to do
Hi Jaya,
Unfortunately I have been out of the SharePoint scene for quite a while and do not have any experience with SharePoint 2010. This blog post relates to SharePoint 2007, so I am not sure whether the same code will work on SharePoint 2010 or not.
– Mike