A large part of SharePoint’s power comes from the fact that the interface is completely pluggable. Users can add web parts to pages of their choice in order to add functionality and features to a SharePoint site on demand. So, an obvious direction any SharePoint developer would take is to learn how to develop web parts. In this post, I will demonstrate how to develop a simple web part that can add two integers together and display the result. We will package this web part into a WSP and deploy it to our local SharePoint farm.
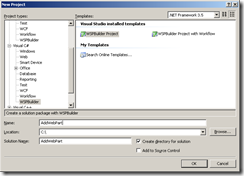
As always, we will be using WSPBuilder to quickly generate our WSP as well as to add the necessary files to our solution to create a web part. So, fire up Visual Studio and create a new WSPBuilder project named “AddWebPart”:
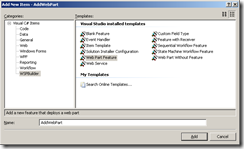
Next, add a Web Part Feature called “AddWebPart” to the solution:
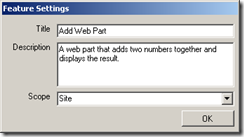
You can use the following information for the dialog that pops up after adding the web part feature to the solution:
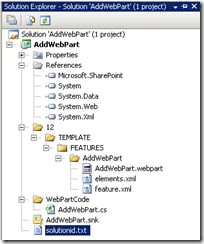
You will see that this will prepare our solution to add a few files into the 12 hive. This also adds a folder to the solution called “WebPartCode” which contains a class file. This class is where we will write all of the code for the web part:
So we have successfully used WSPBuilder to generate the structure of our project. The only thing left to do is write the code for the web part itself. To do this, open up the AddWebPart.cs that is located in the WebPartCode folder. Since this web part is not configurable at all, we can remove the following lines which declare a configurable property for the web part to use:
[code language=”c#”]
private string _myProperty = null;
[Personalizable(PersonalizationScope.Shared)]
[WebBrowsable(true)]
[System.ComponentModel.Category(“My Property Group”)]
[WebDisplayName(“MyProperty”)]
[WebDescription(“Meaningless Property”)]
public string MyProperty
{
get
{
if (_myProperty == null)
{
_myProperty = “Hello SharePoint”;
}
return _myProperty;
}
set { _myProperty = value; }
}
[/code]
Since we have removed this property, we will also have to remove the following line from the CreateChildControls method:
[code language=”c#”]
this.Controls.Add(new LiteralControl(this.MyProperty));
[/code]
Now that we have cleaned up the code a bit, we can begin building our web part. Since we are going to add two numbers together and display the result, we are going to need a few controls to accomplish this. Let’s add the following private variables to our class definition (Note that you may need to add a “using System.Web.UI.WebControls;” statement to this file):
[code language=”c#”]
private TextBox txt1;
private TextBox txt2;
private Button btnAdd;
private Label lblResult;
[/code]
Now that we have delcared the controls we are going to use, the next step is to build out our GUI in the CreateChildControls method. Let’s build out our GUI by placing the following code underneath the comment that says “Your code here…”:
[code language=”c#”]
// Your code here…
txt1 = new TextBox();
this.Controls.Add(txt1);
txt2 = new TextBox();
this.Controls.Add(txt2);
btnAdd = new Button();
btnAdd.Text = “Add”;
btnAdd.Click += new EventHandler(btnAdd_Click);
this.Controls.Add(btnAdd);
this.Controls.Add(new LiteralControl(“
“));
lblResult = new Label();
this.Controls.Add(lblResult);
[/code]
The preceeding code is pretty simple. First we instantiate txt1 and txt2 and add them to the web part’s Controls collection. Next, we instantiate btnAdd, give it’s Text property a value, wire up the Click event, and add it to the web part. Finally, we add a line break by using a LiteralControl and instantiate and add lblResult to the web part. Now that we have our simple GUI, we just have to write the code that adds the two integers together and displays the result. Since we wired our button’s Click event up to a method called btnAdd_Click, let’s finish our web part by writing this method:
[code language=”c#”]
void btnAdd_Click(object sender, EventArgs e)
{
lblResult.Text = (int.Parse(txt1.Text) + int.Parse(txt2.Text)).ToString();
}
[/code]
Here we are simply setting the Text property of lblResult to the sum of the two values entered into the textboxes on our web part. Note that there is no error handling and if integers are not entered, the web part will error out.
Now that our web part is completed, let’s package it up and deploy it to our local SharePoint farm. To do so, first build the project. Next, build the WSP via the WSPBuilder menu in the Tools menu. Finally, we can deploy this solution via the Tools –> WSPBuilder menu as well. (If you need more information or guidance on using WSPBuilder, please visit my Intro to WSPBuilder post.)
After building and deploying your solution, you should see a new feature available in Site Collection Features:
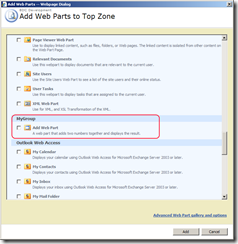
Go ahead and activate the feature. The new web part should now be available:
Let’s add this web part to a page and publish the page. We can then test the functionality by placing an integer in each textbox and clicking the “Add” button. The result should successfully be displayed below the textboxes:
So, there you have it. You should now understand the basics of web part construction. Keep an eye out for future blog posts on web parts, including the ability to make them user configurable by using the tool pane.
Pingback:Adding Configurable Properties to a SharePoint Web Part’s Tool Pane « www.michaelbowersox.com