In a previous post, we developed a simple web part to add two numbers together and display the result. It is a great introduction to web parts in the SharePoint world, but it is lacking any end user configuration. So, let’s go through how to add a bit of configuration to this web part. We will be using the code from the post mentioned above as a starting point for this article.
For this example, we’ll add a user-configurable label to each textbox on our web part. To start, open up the “AddWebPart” project that we created previously. After opening the project, let’s open up AddWebPart.cs. Now, we’ll add the code to the AddWebPart class that displays the configurable properties in the web part’s tool pane:
[code language=’c#’]
[WebBrowsable(true)]
[WebDescription(“Text to display in the first TextBox’s Label”)]
[WebDisplayName(“First TextBox Label”)]
[Personalizable(PersonalizationScope.Shared)]
public string ConfigurableLabel1 { get; set; }
[WebBrowsable(true)]
[WebDescription(“Text to display in the second TextBox’s Label”)]
[WebDisplayName(“Second TextBox Label”)]
[Personalizable(PersonalizationScope.Shared)]
public string ConfigurableLabel2 { get; set; }
[/code]
The code above is simply two properties which have some pre-defined attributes specified. As illustrated above, we are specifying the following attributes for these properties:
- WebBrowsable – Determines whether the property will show in the tool pane
- WebDescription – Displays a tooltip that can help your user fill in this property
- WebDisplayName – Displays a label that describes this property
- Personalizable – Determines whether the web part is configurable on a per-user basis or for all users. For this example, we have chosen all users.
Now that we have added two configurable properties to our web part, we have to change how the web part is rendered. To accomplish this, let’s first add two private variables to the class like so:
[code language=’c#’]
private Label lbl1;
private Label lbl2;
[/code]
Next, we need to modify the try block of the CreateChildControls method to match what is below:
[code language=’c#’]
try
{
base.CreateChildControls();
// Your code here…
lbl1 = new Label();
lbl1.Text = ConfigurableLabel1;
this.Controls.Add(lbl1);
txt1 = new TextBox();
this.Controls.Add(txt1);
lbl2 = new Label();
lbl2.Text = ConfigurableLabel2;
this.Controls.Add(lbl2);
txt2 = new TextBox();
this.Controls.Add(txt2);
btnAdd = new Button();
btnAdd.Text = “Add”;
btnAdd.Click += new EventHandler(btnAdd_Click);
this.Controls.Add(btnAdd);
this.Controls.Add(new LiteralControl(“
“));
lblResult = new Label();
this.Controls.Add(lblResult);
}
[/code]
All we are doing here is adding two new Label controls in the appropriate area of the web part and setting their Text properties to the values entered into our configurable properties we created earlier.
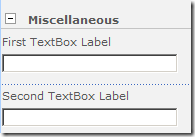
At this point, you should be able to rebuild the solution and use WSPBuilder to deploy it out to your farm. If you haven’t added the web part to a page yet, do so and the modify it. You should see a new section in the tool pane called “Miscellaneous” and your two configurable properties should be in it.
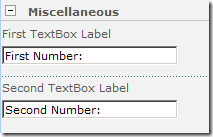
Add a value into each of the textboxes and click OK.
You should see your new labels appear within the web part.
![]() So it’s pretty easy to enable your web parts to be configured by end users. What if you want to provide a control other than a TextBox for your users like a DropDownList? Well, things can get a bit more tricky then, but not unmanageable. Stay tuned for how to do so in the near future.
So it’s pretty easy to enable your web parts to be configured by end users. What if you want to provide a control other than a TextBox for your users like a DropDownList? Well, things can get a bit more tricky then, but not unmanageable. Stay tuned for how to do so in the near future.


Ok – so I need some help doing this in sharepoint 2010….and to the Content By Query webpart which I have created a copy of. My custom webpart (a clone of CBQ) needs some custom tool pane options. Any resources you could point me too..or would you like to earn some consulting cash helping us out for a couple of hours tomorrow? thanks