As you begin developing more and more complex features to be deployed to SharePoint, you will most likely come across the need to perform some additional actions when your feature is installed and activated as well as extra clean-up when your feature is deactivated and uninstalled. In come Feature Receivers to do just this. Feature receivers are a must-use for all SharePoint developers that will be deploying WSP files to a farm. Simply put, feature receivers allow code to execute during a few events in the feature lifecycle. The events you can trigger the execution of code on are:
- FeatureActivated
- FeatureDeactivating
- FeatureInstalled
- FeatureUninstalling
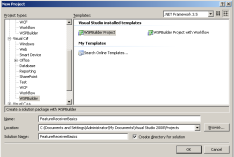
To illustrate how to use Feature Receivers, we’ll create a blank feature and add a feature receiver which will create a custom list and add some items into it during the FeatureActivated event. To start, let’s create a new WSPBuilder project called “FeatureReceiverBasics”. (If you don’t know what WSPBuilder is or don’t have it installed, check out my Intro to WSPBuilder article to get up to speed.)
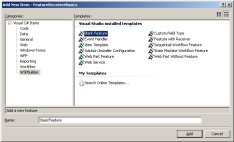
After creating the project, let’s first add a reference to Microsoft.SharePoint.dll. We will need to reference this DLL in order to have access to the SPFeatureReceiver class that our feature receiver will inherit from. Next, add a Blank Feature named BasicFeature. See the screenshot below for the location of this template. (Note that there is a “Feature With Receiver” template available which will automatically add the necessary items to the project and wire everything up. We will not be using this template since the whole point of this article to gain an understanding of how feature receivers work and are implemented.)
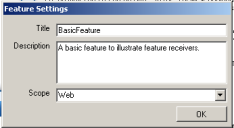
When prompted, use the following information for title, description, and scope:
Next, let’s add a new class to the project and name it FeatureReceiverBasicsReceiver.cs. We will need to add a using statement, inherit from SPFeatureReceiver, and generate a few method stubs as illustrated in the code below:
[code language=’c#’]
using System;
using System.Collections.Generic;
using System.Text;
using Microsoft.SharePoint;
namespace FeatureReceiverBasics
{
class FeatureReceiverBasicsReceiver : SPFeatureReceiver
{
public override void FeatureActivated(SPFeatureReceiverProperties properties)
{
}
public override void FeatureDeactivating(SPFeatureReceiverProperties properties)
{
}
public override void FeatureInstalled(SPFeatureReceiverProperties properties)
{
}
public override void FeatureUninstalling(SPFeatureReceiverProperties properties)
{
}
}
}
[/code]
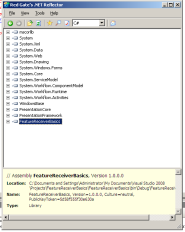
Next step is to build the project and open up the resulting DLL with Reflector to get the strong name of our assembly:
After we have the strong name of the assembly, we’ll have to wire up our feature to the assembly. This is accomplished by adding a ReceiverAssembly and ReceiverClass attribute to the Feature node in the feature.xml file. The ReceiverAssembly node should contain the strong name of the assembly where the FeatureReceiverBasicsReceiver class is located and the ReceiverClass should be the full name of the class of the receiver. When finished, your feature.xml file should look something like the following:
[code language=’xml’]
[/code]
At this point, you should be able to deploy and test your feature using WSPBuilder. First use Tools –> WSPBuilder –> Build WSP to create the WSP file. Next use Tools –> WSPBuilder –> Deploy to make the feature available to your farm. If all goes well you should see the feature listed under Site Features:
We can activate this feature on a site if we want to, but nothing will happen since we haven’t written any code in the receiver yet. For this example, we’ll use the FeatureActivated event to create a custom list named States and insert some data into that list as well as the FeatureDeactivating event to remove this list. Adding the following code to our feature receiver will accomplish this:
[code language=’c#’]
public override void FeatureActivated(SPFeatureReceiverProperties properties)
{
// Get a reference to the site we activated the feature on
SPWeb thisWeb = (SPWeb)properties.Feature.Parent;
// Create a new list and get a reference to it
Guid thisListId = thisWeb.Lists.Add(“States”, “States where we do business”, SPListTemplateType.GenericList);
SPList thisList = thisWeb.Lists[thisListId];
// Add some custom fields to the list
thisList.Fields.Add(“State Name”, SPFieldType.Text, true);
thisList.Fields.Add(“State Abbreviation”, SPFieldType.Text, true);
thisList.Update();
// Adjust the default view to show our custom fields
SPView thisView = thisList.DefaultView;
thisView.ViewFields.DeleteAll();
thisView.ViewFields.Add(“State Name”);
thisView.ViewFields.Add(“State Abbreviation”);
thisView.Update();
// Add a few sample list items
SPListItem thisListItem = thisList.Items.Add();
thisListItem[“State Name”] = “New York”;
thisListItem[“State Abbreviation”] = “NY”;
thisListItem.Update();
thisListItem = thisList.Items.Add();
thisListItem[“State Name”] = “New Jersey’;
thisListItem[“State Abbreviation”] = “NJ”;
thisListItem.Update();
thisListItem = thisList.Items.Add();
thisListItem[“State Name”] = “Connecticut”;
thisListItem[“State Abbreviation”] = “CT”;
thisListItem.Update();
thisListItem = thisList.Items.Add();
thisListItem[“State Name”] = “Pennsylvania”;
thisListItem[“State Abbreviation”] = “PA”;
thisListItem.Update();
}
public override void FeatureDeactivating(SPFeatureReceiverProperties properties)
{
// Get a reference to the site we activated the feature on
SPWeb thisWeb = (SPWeb)properties.Feature.Parent;
// Remove the custom list
thisWeb.Lists[“States”].Delete();
thisWeb.Update();
}
[/code]
Let’s go ahead and deploy our WSP again. This time when you activate the feature on a site, you should see a new list on the site:
If you take a look inside the list, you should see the modifications that we made to the default view as well as the data we entered:
When you deactivate the feature, this list should be completely removed from the site.
Hopefully this post illustrates how easy it is to use feature receivers as well as how useful they can be. Feature receivers can be used for nearly anything your mind can think of. I primarily use them to deploy supporting content that needs to be pushed out along with any features I develop.


